2 weeks ago I became the proud new godmother of a baby girl named Maxine... I am very excited because I do admit that sewing for little girls can be more exciting than for little boys. It's not that you can't find nice patterns out there for boys, it's just that there is so much more variety in fabrics, patterns and notions that makes it so much more exciting. You also can't ignore the fact that girls appreciate a nice dress so much more than boys like a new pair of pants...
I made Maxine a variety of presents of which I will present the first one today... As my cousin, who is Maxine's mum was still looking for some decorations for her bedroom I made a a small pink detail wall weaving. I figured it wasn't too baby-like so she could probably keep it on her wall until she's well in her teens.
Hopefully this will bring the finishing touch to the little one's room...
Phew... 42 degrees is way too hot for my liking! Windows are all steamed up and it's a true sauna out here... On top of that, we're in the middle of Ramadan so me and my little one are clustered to home. As he's having longer and longer naps during the day it's not necessarily a bad thing!
I finally managed to make myself a dress. Well... it's taken me about 18 months! I started this dress just before I got pregnant. Unfortunately, as soon as we received the news about our little baba I completely lost interest. I started sewing baby clothes like there was no tomorrow and when I finally felt like making myself something new, I simply wouldn't fit in it anymore...
Anyway, I've reached the point where it's nice to have some time to myself.
The pattern I used for this dress is Vogue 8766.
I was inspired by a Prada dress I saw in a magazine. The dress had bright colored horizontal stripes and had a 1920's feel to it, with a modern twist.
Vogue 8766 reminded me of this dress and with some minor changes, especially length wise I created my own Prada dress!
I used bright pink stretch jeans for the dress and lined it in a cotton of the same color.
I shortened the dress by approximately 20 cm and made the ruffle about 5 cm shorter...
Now counting down for the cool weather to return and in the mean time... sew!
Ahoy pirates! I'm back... My excuses for my resent absence. The tummy is getting bigger by the day and my energy level has reached rock bottom. We're impatiently awaiting our little one and we are so excited!
Although I do admit I have taken it pretty slowly over the last few months, it's not like I haven't done anything. I've been sewing some little trousers, and tops but the piece I'm most proud of is most definitely this one :
My little one's first jacket! Yes, I know, I've made it a bit prematurely (it's a size 3 to 4 years) but I thought it would probably be the age a kid enjoys a pirate outfit most...
I bought the e-pattern from Biglittle, an Etsy shop. The pattern is well explained and has lots of pictures. The jacket was a little time consuming due to the many small pieces of felt which needed to be hand stitched or embroidered on the jacket but I absolutely love the result.
The treasure map as well as the loot bag are detachable as they are stitched on with snap buttons, just to help with treasure hunting of course!
I also love the dagger on the front side and the pirate flag at the back, just like a real pirate!
The finishing touch are definitely the pirate buttons which I found by accident on a fleamarket (15 hand painted pirate buttons for 3 euros). You might notice that the button holes aren't finished yet... This is because I'm working on my mums sewing machine currently. I'd rather make them on my own machine as I'm more familiar with it so I'm waiting to return home to finish the job...
Captain Jack, eat your heart out!
Babies are expensive... There's no denying it! Up until a few months ago I had no clue that a jacket for a 3 month old can buy you a week's worth of groceries...
Not that that's what I would pay... Natty thrifting queen has been busy checking out every possibility on saving money, without giving in on quality.
First of all I checked out our local classified. It's amazing what you can find on there... I have to admit it can be quite a frustrating business but with a some patience and a bit of luck you can find really nice stuff. I found a baby bed and changing table as well as a baby swing , all in very good condition, for a fraction of the retail price.
I also discovered a few amazing second hand hand baby clothes shops in Brussels. And I'm not talking Salvation Army... Some shops sell very nice brands like Jacadi, Gold Belgium, Bonpoint....
Of course I also make quite a bit myself!
And today I did some furniture upscaling... We had some old drawers in our guest bedroom, furniture we received from my husband's company years ago. It was quite ugly to be honest, not even in real wood I think. The drawers were still in quite good condition though and I thought it would be a shame to get rid of it. I especially didn't want to splurge on expensive new furniture.
The drawers were ideal though for a good old fashioned make over. I mean, what is there to loose if something does go wrong?
We, actually my dad started off by giving the whole chest a nice white coat. I would have loved to do it myself but figured it was probably not the good to get in contact with paint, being pregnant... Anyway, I found these cute blue doorknobs in Zara Home which I thought looked very nice against the white background. In the craft shop I found wooden templates which I painted and varnished and stuck on the middle drawer.
Now let's start on the second one...
Finally... I'm back! It feels like blog years ago since I last spoke to you but here I am... My parents are currently visiting me in Dubai which makes me a tour operator/entertainer/cook/driver for about 18 hours a day.
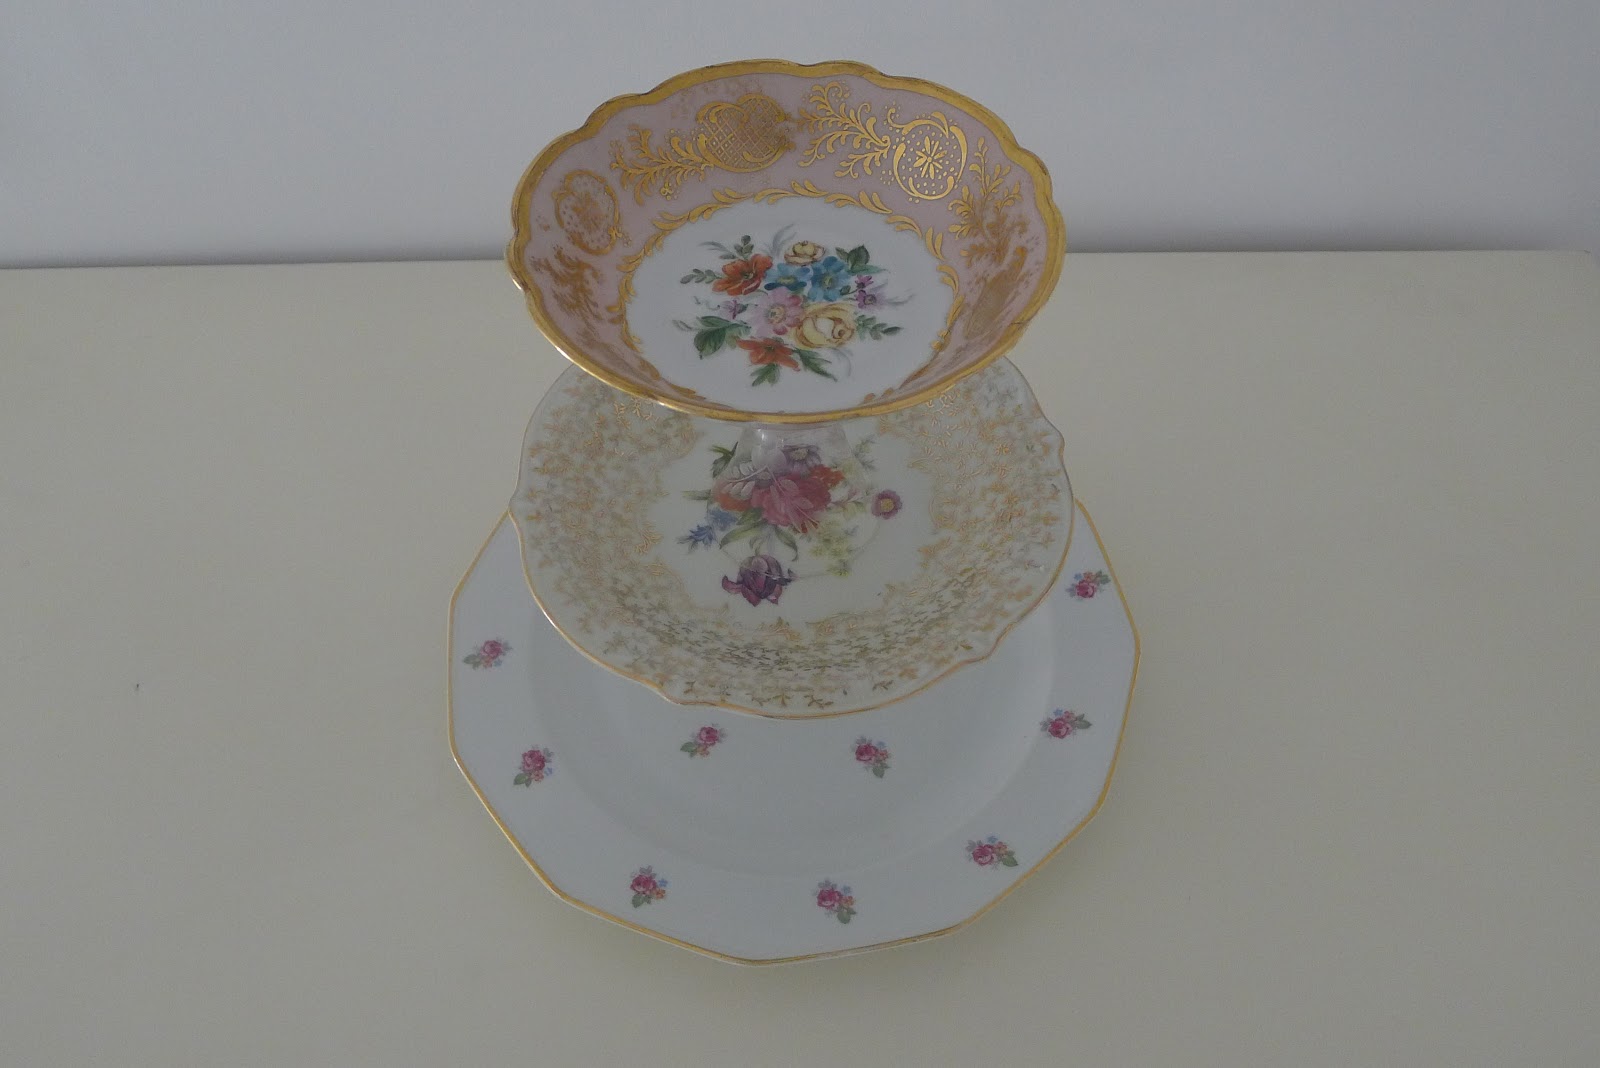
I did manage to find a some of time off to do a a little bit of crafting. A few months ago I bought these beautiful vintage plates on a flea market in Brussels. The project I had in mind was an old fashioned cake stand made out of plates and liqueur glasses. I found the glasses as well as 2 nice plates but hadn't found the perfect base plate yet.
Well last month I finally found the plate I was looking for. And the cake stand is finished. Amazing what you can make out of some old crockery and superglue!
For some reason my Christmas ideas keep pouring into my mind this year... It’s probably also because I’ve been reading lots of blogs these days made by people who have even better ideas than me.
Prudent baby for example... I am a great fan of Jaime and Jacinda’s website. These 2 ladies are real crafting prodigies and oh so inspiring! Last week they discussed these really cute snow globes. Martha Stewart makes them too. I thought they’d make a really nice Christmas present...
My initial idea was to try out the proper snow globes with water and glitters. As I soon found out my jam jars were leaking water I decided to go for snow globes without water...
For the snow globes you’ll need: jam jars, glue, Christmas ornaments, Christmas ribbon, fake snow and paper letters. Make sure the ornaments actually fit inside the jar (Yes I did it, dah!)...
Girls always like their smelly stuff... That’s why I’m so fond Martha Stewart’s organic body scrub.
You can make your body scrub with either sugar or salt, with larger or smaller grains, whatever floats your boat.
I prefer to make mine with cane sugar as I like the size of the grains. You can also use white sugar if you prefer a softer scrub.
Here’s what you’ll need:
500g of organic cane sugar
125ml of vegetable oil
food colouring
essence oil (I use rose)
Mix the whole lot into a bowl and pack into jam jars.
The finishing touch are cuttlebug made tags.
For the oil I personally use bio body oil cause I love that one. If you use vegetable oil then buy the high quality one as they don’t smell. Don’t use olive oil unless you want the scrub to be olive flavored.
Now scrub away...
Dear Santa,
I know this is a very busy time of the year for you. I hope however you have a minute or two to read my letter...
Even though I have been a bit naughty at times, I ask you to consider making my dream come true.
I promise I will be a good girl in 2012.
Santa, I know I’m asking you again for this amazing Brother 1500D sewing/embroidery machine with all its Disney features but only because my machine is almost falling apart (and I really want it!). I would be so grateful...
You might not have heard yet of this machine Santa. It’s a die cutting machine great for home decoration, scrapbooking and crafting. It has a USB port so you can import designs. It’s really cool!
Colette patterns make some of my favourite patterns. Now they brought out their own book with extra patterns inside. Maybe I can even make you something... What about a Negroni shirt for you Santa?
Here’a another book Santa. Burdastyle (my favourite website) have just published their book too. Full of tips and inspiration...
Please Santa, think of me when you pass by Dubai. And don’t forget to pop in for a glass of gluhwein...
Natty
Those of you who read my blog from time to time will know I’m a big Cath Kidston fan. I love anything shabby chic, much to my husbands annoyance. At first I was to keep the vintage style to the kitchen but according to him it’s spreading throughout the house... What can I say, a girl likes what a girl likes!
So as a shabby chic Christmas tree would have pushed my husband over the edge I made my own Cath Kidston version for the kitchen.
Again using the decoupage technique I this time used Cath Kidston Christmas napkins. The actual Christmas tree I bought in the craft store...
All you crafters out there will know there’s nothing nicer than making your stocking fillers yourself. I started off today by making some Christmas brooches.
I choose some Christmas decorations which are quite light as they hang nicer on your clothes.
You’ll need ornaments, superglue and metal brooches.
Et voila!
PS: Greetings from Rudolph...
I found these wooden Noel letters last week in the craft store. The craft store I usually visit (Creacorner) sold a selection of different kinds of letters: solid wood letters or the laminated wood ones either in natural colour or white. I ended up buying the solid wood ones for the simple reason that the 4 Noel (Christmas) letters came already pre packed. I also just wanted to place them on the mirror frame in our hall so it didn’t matter that they were slightly heavier than the laminated ones.
To decorate the letters I once again dug into my Christmas napkin collection and ended up going for the mistletoe design...
Two weeks to go....!
Can you believe it... It’s almost Christmas again! Yes, time flies when you have fun they say but I definitely have to make a start to get this year’s pressies ready in time.
It’s still a bit early I think to start transforming the house in one massive winter wonderland but there’s no harm in putting a few Christmas knickknacks around the house. I usually start decorating after Saint Nicholas (which we celebrate on the 6th of december in my home country) but as there’s no sight of the long bearded man over here in Dubai I thought what the heck...

This idea is actually one I stole from a Belgian Christmas magazine. I thought the apples looked so Christmassy, decorative and delicious all at the same time I just had to make them.
The concept is very easy: you need apples (preferably red ones) and icing sugar. The ready to use sugar from the supermarket (or lazy girl’s icing as I call it) does the job perfectly fine. Decorate the apples to your liking and they’ll look beautiful in a bowl on your kitchen table.
Now let’s see how long they’ll stay on the dining table before someone munches them away;)
When you want to do a lamp shade makeover Ikea is the place to be, not only for their wide range of lamps but also for their variety of shades which you can mix and match.
Usually there’s something for everyone, regardless of your taste.
Not this time though... I thought most lamps were either boring or screamed “kitch”.
I did find one in the end and ended up buying this:
A little plain you might think... Well, that’s exactly what I thought too but it makes it perfect to makeover!
I decided I wanted to go with a pastel yellow as it looks nice and fresh in the kitchen. And God, what meter of left over lace can do!
Lamp Bran 14,95 euro and shade Jara 7,00 euro
all from ikea.